Banana pudding is one of those timeless desserts that never goes out of style. Creamy, sweet, and layered with soft bananas and crunchy vanilla wafers, it’s a treat that feels both nostalgic and refreshing. What makes banana pudding even more fun is when it’s served in cups or jars, turning a classic dish into a perfectly portioned, no-bake dessert. Banana Pudding Cups are a simple way to enjoy all the flavors of the traditional layered pudding but in a format that is convenient, portable, and party-friendly.
Because this recipe uses instant pudding and store-bought cookies, it comes together in just minutes. There’s no baking, no complicated steps, and no need for special equipment. It’s a dessert you can prepare ahead of time and keep chilled until you’re ready to serve. That makes it ideal for potlucks, cookouts, birthday parties, or just a weeknight treat for the family.
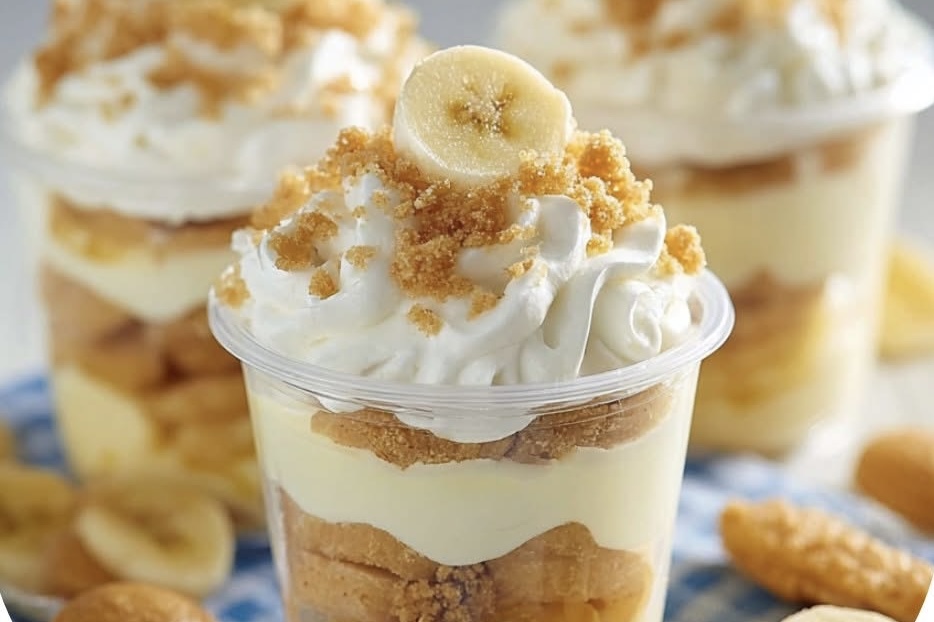
The beauty of serving banana pudding in cups is how pretty the layers look when you use clear glass jars or plastic cups. Each spoonful delivers a bit of creamy pudding, fresh banana slices, crunchy cookies, and fluffy whipped topping. It’s indulgent yet light at the same time, and everyone loves digging in to find the hidden layers.
Here’s how to make your own no-bake Banana Pudding Cups.
Banana Pudding Cups
Ingredients
- 1 (5.1 oz) box instant vanilla or banana cream pudding mix
- 3 cups cold whole milk
- 1 teaspoon vanilla extract (optional)
- 2–3 ripe bananas, sliced
- 1 box Nilla Wafers (or your favorite vanilla cookies)
- 1 container whipped topping (Cool Whip or homemade)
- Crushed wafers or cookie crumbs for topping
Instructions
- Make the Pudding
In a large bowl, whisk together the pudding mix, cold milk, and vanilla extract until the mixture thickens, which takes about two minutes. Let it rest for five minutes to fully set. This will give you a smooth, creamy base that holds the layers together. - Layer the Cups
Take clear cups, jars, or small dessert bowls. Add a spoonful of pudding at the bottom of each cup. Place a few banana slices and a couple of Nilla Wafers on top of the pudding. - Repeat Layers
Continue layering pudding, bananas, and wafers until the cup is nearly full. Each layer builds flavor and texture, giving you the perfect balance in every bite. - Top It Off
Finish with a generous dollop of whipped topping. Sprinkle crushed wafers or cookie crumbs on top for crunch and decoration. Add a banana slice or two as garnish for a polished look. - Chill
Refrigerate the cups for at least one hour before serving. Chilling allows the cookies to soften slightly, creating that classic pudding texture where the layers meld together beautifully. For best results, let them sit for up to four hours.
The result is a dessert that looks elegant and tastes irresistible.
One of the best things about this recipe is its flexibility. You can swap vanilla pudding for banana cream pudding if you want an even stronger banana flavor. You can also use chocolate or butterscotch pudding for a creative twist. If you prefer homemade whipped cream, you can whip heavy cream with a bit of sugar and vanilla until soft peaks form, and use that instead of store-bought topping.
For the cookies, Nilla Wafers are the traditional choice, but you can experiment with graham crackers, shortbread cookies, or even Biscoff cookies for a caramelized flavor. Each variation gives a different character to the dessert, so you can customize it to your liking.
Storage is simple too. These cups should be kept chilled in the refrigerator until serving. They are best eaten within 24 hours, since bananas tend to brown after sitting too long. If you’re making them in advance, you can prepare the pudding and layers without the banana slices, then add the fresh banana and whipped topping just before serving. This keeps everything looking fresh and appealing.
Banana Pudding Cups are not just for adults—they are a big hit with kids as well. The individual servings make them fun to eat, and the flavors are familiar and comforting. You can even set up a pudding cup bar at a party, where guests can assemble their own layers with pudding, bananas, cookies, and toppings like chocolate chips, caramel sauce, or crushed nuts.
If you want to dress them up, consider serving them in small mason jars tied with ribbon for a rustic presentation. For holidays, you can sprinkle a dash of cinnamon or nutmeg over the whipped topping, or add colored sprinkles for a festive touch. They also make excellent picnic desserts because they travel well when kept in a cooler.
Another reason these pudding cups are so loved is the balance of textures. The pudding is creamy, the bananas are soft and sweet, the cookies add crunch (or soften into a cake-like layer after chilling), and the whipped topping gives it a light and airy finish. It’s a dessert that feels indulgent but isn’t heavy, and one that can easily satisfy a sweet tooth without being overwhelming.
Banana Pudding Cups are also a wonderful way to use up ripe bananas. Instead of baking banana bread every time, you can slice the bananas into these layers and have a fresh, cool treat in minutes. It’s a fun change from baked banana desserts and works especially well in warm weather when you don’t want to turn on the oven.
For parties, these little cups make serving easy because there’s no cutting or scooping required. Everyone gets their own portion, and cleanup is minimal. If you want to prepare them for a crowd, you can double the recipe and make a large tray of pudding, then scoop it into cups when you’re ready to serve.
Banana Pudding Cups are proof that simple recipes can deliver big results. With just a handful of ingredients and no baking required, you can create a dessert that looks beautiful, tastes delicious, and pleases both kids and adults. Whether you’re preparing them for a casual family dessert or a special gathering, these creamy, dreamy cups are always a crowd-pleaser.