This cake recipe combines the deep richness of chocolate with the natural sweetness of ripe bananas and honey. The texture is moist and soft, almost like a brownie-meets-cake hybrid. Oats replace flour for a wholesome twist, and a layer of silky chocolate ganache takes it from simple to celebration-worthy.
It’s perfect for any occasion—a birthday, an afternoon treat, or even a healthier dessert option when you’re craving something sweet but want to keep things a little lighter. You don’t need any fancy mixers or complicated techniques. Just a blender or mixing bowl, two cake pans, and a love for chocolate.
Ingredients
2 ripe bananas (mashed)
2 eggs
1 cup oats (quick or rolled)
1/2 cup cocoa powder
1/2 cup honey or maple syrup
1/4 cup vegetable oil
1 teaspoon baking powder
1 teaspoon vanilla extract
Pinch of salt
For the Ganache
1/2 cup heavy cream
1 cup chocolate chips (or chopped chocolate)
Optional: chocolate curls or shavings for garnish
Instructions
Step 1: Preheat and Prepare the Cake Pans
Preheat your oven to 175°C (350°F). Lightly grease and line the bottoms of two 8-inch round cake pans with parchment paper. This will help the cakes release easily after baking and also prevent sticking, especially since this cake doesn’t contain traditional flour.
Step 2: Blend the Cake Batter
In a blender or food processor, combine all the main cake ingredients: the mashed bananas, eggs, oats, cocoa powder, honey or maple syrup, vegetable oil, baking powder, vanilla extract, and a pinch of salt.
If you prefer, you can mash the bananas by hand in a large bowl, then whisk in the other wet ingredients before folding in the dry ones. However, blending everything results in a smoother, more cohesive batter.
Blend until the mixture is smooth and thick. The oats will break down and help form a smooth structure. You may need to scrape down the sides of the blender a few times to make sure everything is fully incorporated.
Step 3: Divide and Bake
Pour the batter evenly between the two prepared cake pans. Use a spatula to smooth the tops, making sure they’re level for even baking.
Place the pans in the preheated oven and bake for 20 to 25 minutes. Begin checking at the 20-minute mark. Insert a toothpick into the center of each cake—if it comes out clean or with just a few moist crumbs, the cakes are ready.
Don’t overbake. Since this cake is naturally moist, you want to preserve that texture. Let the cakes cool in the pans for 5 to 10 minutes before turning them out onto wire racks. Allow them to cool completely before adding the ganache.
Making the Chocolate Ganache
Ganache is simply a mixture of hot cream and chocolate that melts into a smooth, rich frosting or glaze. It’s incredibly easy to make but delivers impressive results.
Step 1: Heat the Cream
In a small saucepan, heat the cream gently over low to medium heat. You don’t want it to boil—just heat until it’s steaming and small bubbles begin to appear around the edges.
Alternatively, you can microwave the cream in a heat-safe bowl in 20- to 30-second bursts until it’s hot.
Step 2: Pour Over Chocolate
Place the chocolate chips or chopped chocolate in a medium bowl. Pour the hot cream directly over the chocolate. Let it sit undisturbed for about 2 minutes. This allows the heat from the cream to begin melting the chocolate without stirring too early.
Step 3: Stir Until Smooth
After 2 minutes, begin gently stirring the mixture in small circles from the center outward. The chocolate will slowly melt and combine with the cream to form a glossy, smooth ganache.
If the chocolate hasn’t fully melted, you can microwave the bowl in short bursts (10 to 15 seconds) and stir again.
Let the ganache cool slightly. As it sits, it will thicken to a spreadable consistency—perfect for layering and coating the cake.
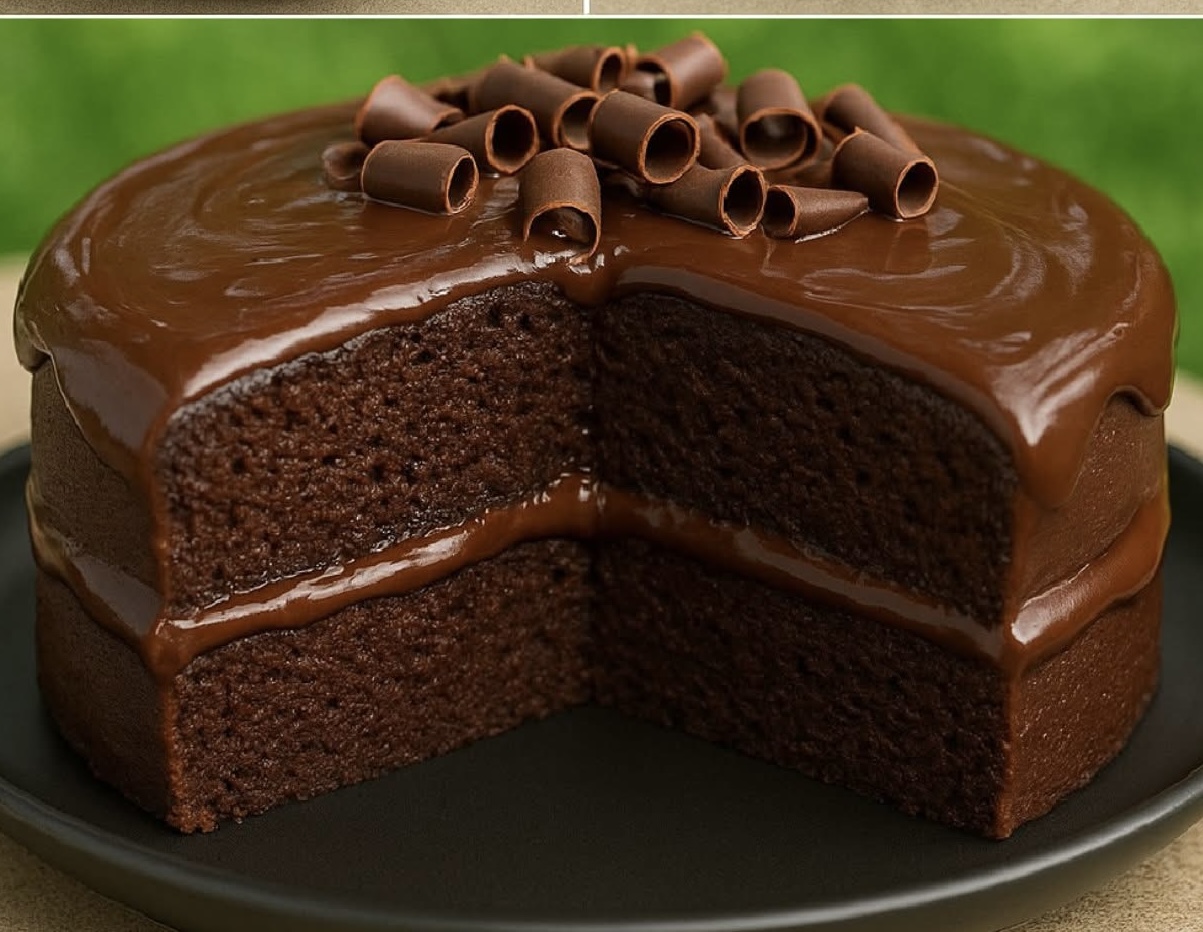
Assembling the Cake
Once the cakes are fully cool and the ganache has thickened slightly, it’s time to assemble.
Place one cake layer on a serving plate or cake stand. Spread a generous amount of ganache over the top using an offset spatula or butter knife. Be sure to push the ganache all the way to the edges for even coverage.
Place the second cake layer on top. Press down gently to ensure it’s level.
Spread the remaining ganache over the top of the cake, and if desired, around the sides. Smooth the surface or create swirls and ridges for texture.
Garnish with chocolate curls, shavings, or a dusting of cocoa powder if you like. The ganache will firm up slightly as it sets.
Notes and Tips
Bananas: Use overripe bananas with dark spots on the skin. They’re sweeter and softer, making them easier to mash and better for binding.
Oats: Both quick oats and rolled oats work well. If using rolled oats, blending them ensures they break down fully. If you want a lighter crumb, you can blend the oats into oat flour first.
Sweetener: Honey gives the cake a warmer, more caramel-like note, while maple syrup offers a lighter sweetness. Both are natural options that blend beautifully with the cocoa.
Oil: Any neutral vegetable oil will do—sunflower, canola, or even light olive oil. You could also experiment with coconut oil for a subtle coconut flavor.
Cocoa Powder: Use unsweetened cocoa powder. Dutch-processed will give a deeper color and smoother taste, while natural cocoa will offer a more intense, slightly acidic note.
Ganache Variations: You can add a pinch of salt or a splash of vanilla extract to the ganache for more complexity. To make it firmer, increase the amount of chocolate. For a softer glaze, use a little more cream.
Pan Sizes: Two 8-inch pans yield a layered cake with moderate thickness. You can also bake it in a 9×9-inch square pan or a single round pan for a simpler presentation. Adjust the baking time accordingly.
Storage and Serving
This cake stays moist for several days when stored properly.
Room Temperature: Keep covered in a cool spot for up to 2 days.
Refrigerator: Store in an airtight container for up to 5 days. The ganache will firm up slightly when chilled but will soften again at room temperature.
Freezing: You can freeze the cake layers before assembling. Wrap each layer tightly in plastic wrap and foil, then freeze for up to 2 months. Thaw in the fridge overnight before frosting.
The ganache can also be made ahead and refrigerated for up to 5 days. Reheat gently and stir before using.
To serve, slice with a clean, sharp knife. For extra neat slices, dip the knife in hot water and wipe clean between cuts.
Why This Cake Works
This cake hits a sweet spot between indulgence and nourishment. The bananas not only add natural sweetness but also help keep the cake moist without needing much fat. The oats add structure and a subtle nuttiness, while the eggs and oil give just enough richness to balance the density.
It’s gluten-free if you use certified gluten-free oats, and it’s naturally dairy-free (without the ganache topping). You can customize the frosting or skip it altogether for a simple snack cake.
Despite being made with wholesome ingredients, the cake tastes like a full-on chocolate treat. It’s soft, satisfying, and deeply chocolaty thanks to the cocoa and the banana-oat base.
The ganache adds a silky, fudgy finish that elevates the cake to bakery-level elegance without extra effort.
Variations and Customizations
Add-ins:
Fold in 1/2 cup chopped walnuts, pecans, or chocolate chunks into the batter for added texture.
Spices:
Add a pinch of cinnamon or espresso powder to deepen the flavor of the chocolate.
Frosting Alternatives:
Swap the ganache for whipped cream, chocolate buttercream, or a banana cream cheese frosting if you prefer.
Single Layer Option:
Bake the batter in a 9-inch springform pan or loaf pan for a simpler presentation. Adjust baking time to 30 to 35 minutes.
Mini Cakes or Muffins:
Pour the batter into a muffin tin for 12 cupcake-sized cakes. Bake for 15 to 18 minutes and top with a dollop of ganache or leave plain.
Final Thoughts
This chocolate banana oat cake offers everything you want in a dessert: rich flavor, moist texture, minimal ingredients, and easy execution. It’s a reliable go-to recipe that you can make in under an hour, and it comes together with pantry staples you probably already have on hand.
Whether you’re looking for a slightly healthier take on chocolate cake or just need a quick and satisfying dessert for guests, this one ticks all the boxes.
It’s the kind of recipe that once you try, you’ll come back to over and over again—simple, delicious, and endlessly versatile.