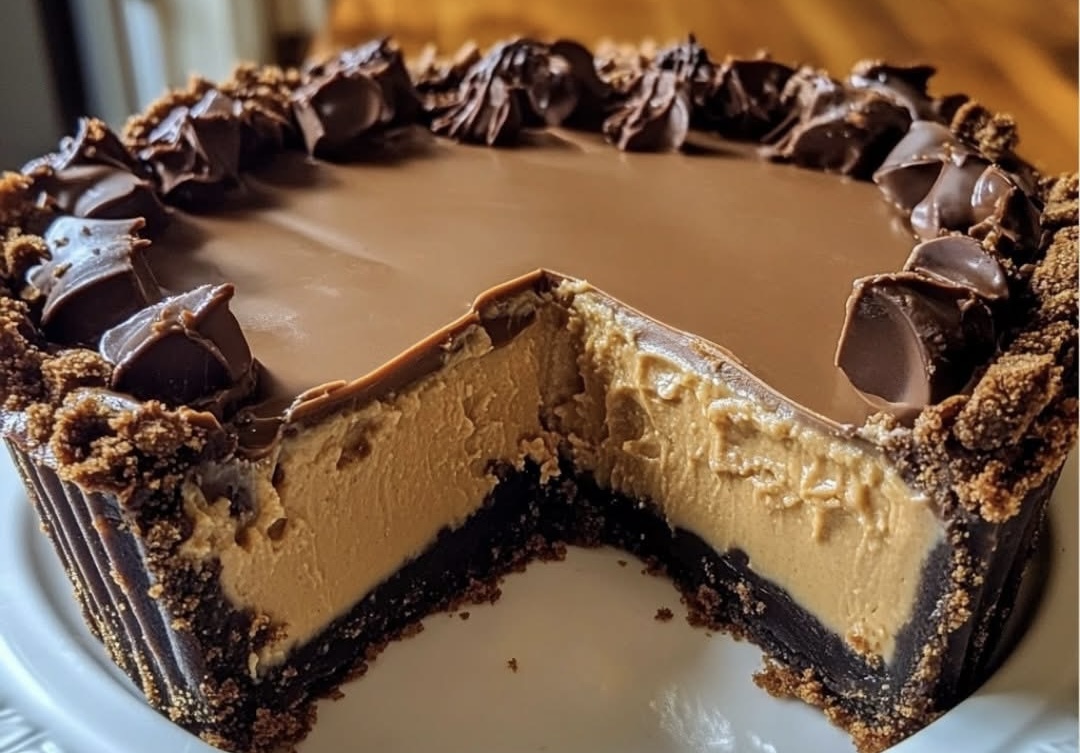
This pie is everything you love about a chocolate peanut butter cup, transformed into a silky, sliceable dessert with clean layers and a lush, creamy texture. A press-in chocolate cookie crust brings a deep cocoa crunch, a shiny layer of soft chocolate ganache adds truffle-like richness, and a cloud of peanut butter mousse finishes it with just the right sweetness and lift. Topped with chopped Reese’s cups, every bite gives you contrast: crisp, smooth, salty-sweet, and irresistibly chocolatey. It’s no-bake, make-ahead friendly, and perfect for celebrations, potlucks, or a cozy night in.
What makes this recipe special is balance. The crust is firm enough to slice cleanly but tender to the fork. The ganache sets to a soft truffle that doesn’t shatter when cut. The mousse is light from whipped cream yet stable, thanks to cream cheese and powdered sugar. You won’t need fancy tools or advanced techniques—just a few bowls, a whisk or mixer, and a standard 9-inch pie plate.
Ingredients
For the crust:
1½ cups (150g) crushed chocolate cookies (like Oreos, minus filling)
3 tablespoons unsalted butter, melted
For the chocolate ganache layer:
4 oz (115g) semi-sweet chocolate, finely chopped
½ cup (120ml) heavy whipping cream
For the peanut butter mousse layer:
8 oz (225g) full-fat cream cheese, softened
½ cup (125g) creamy peanut butter
⅓ cup (67g) powdered sugar
1 teaspoon pure vanilla extract
1 cup (240ml) heavy whipping cream, chilled
For the topping:
½ cup Reese’s peanut butter cups, chopped into small pieces
Optional: light drizzle of caramel sauce or chocolate shavings
Instructions
Prepare the crust: In a medium bowl, combine the crushed chocolate cookies and melted butter until evenly moistened. Press firmly into the bottom and up the sides of a 9-inch pie plate, packing the crumbs so they form a solid shell without gaps. Chill while you prepare the layers.
Make the chocolate ganache: Place the chopped chocolate in a heatproof bowl. Warm the heavy cream in a small saucepan over medium heat just until it begins to simmer around the edges. Pour the hot cream over the chocolate and let stand for 1 minute. Stir gently, starting in the center and working outward, until completely smooth and glossy. Pour into the chilled crust and spread evenly. Refrigerate for 15–20 minutes to lightly set.
Whip the peanut butter mousse: In a large bowl, beat the softened cream cheese, peanut butter, powdered sugar, and vanilla extract on medium speed until smooth and creamy, about 2 minutes. In a separate bowl, whip the chilled heavy cream to stiff peaks. Gently fold the whipped cream into the peanut butter mixture in two or three additions until fully combined. Avoid overmixing so the mousse stays light.
Assemble the pie: Spread the peanut butter mousse evenly over the cooled ganache layer. Smooth the top with an offset spatula or the back of a spoon.
Add the topping: Scatter the chopped Reese’s peanut butter cups over the mousse. Add a light drizzle of caramel sauce or a shower of chocolate shavings if you like extra flourish.
Chill and serve: Refrigerate the pie for at least 3 hours, preferably overnight, to allow the layers to set completely. Slice with a sharp knife dipped in warm water and wiped dry between cuts for clean edges. Serve chilled.
Why this pie works
The crust holds: Melted butter binds the cookie crumbs, and chilling helps the fats firm up, so the crust slices cleanly instead of collapsing. Pressing the crumbs firmly up the sides prevents slippage and creates the classic deep-dish look.
Ganache that doesn’t crack: The ratio of cream to chocolate creates a soft set that slices neatly. Letting the ganache cool and just begin to thicken before adding the mousse keeps layers distinct.
Stable, airy mousse: Cream cheese provides structure and mild tang; peanut butter adds body; powdered sugar sweetens and helps stabilize. Folding in whipped cream at stiff peaks gives volume without weeping.
Make-ahead friendly: Because each component sets in the refrigerator, you can assemble the pie the day before serving and hold it cold until you’re ready to slice.
Tools you’ll need
9-inch pie plate
Mixing bowls
Hand mixer or stand mixer with whisk attachment
Rubber spatula and offset spatula
Small saucepan
Sharp chef’s knife for slicing and a paring knife for chopping Reese’s cups
Ingredient notes and substitutions
Chocolate cookies: Oreo-style cookies bring both cocoa flavor and a fine crumb. If you use a different brand, aim for the same texture. If your crumbs are very dry, add another teaspoon of melted butter to help them press smoothly.
Butter: Unsalted butter controls the salt level. If you only have salted butter, reduce any added salt in optional variations.
Semi-sweet chocolate: Choose a bar in the 50–60% cacao range. Chocolate chips work, but bars melt silkier. For a darker flavor, use bittersweet chocolate; for a milder taste, use milk chocolate and reduce the powdered sugar in the mousse by a tablespoon to keep the pie from skewing too sweet.
Peanut butter: Use conventional creamy peanut butter for best texture. Natural peanut butters that separate can be used if very well stirred, but the mousse may be slightly looser. Avoid crunchy if you want a perfectly smooth layer.
Cream cheese: Full-fat is important for structure and a plush texture. Low-fat can make the mousse softer and less stable.
Heavy cream: Chill the cream and bowl for faster whipping. Aim for firm peaks that hold their shape when you lift the whisk, but stop before the cream turns grainy.
Reese’s peanut butter cups: Standard minis or full-size cups chopped into small pieces are both fine. Keep a few larger chunks for visual appeal on top.
Step-by-step success tips
Crust compaction: Use the bottom of a flat-bottomed measuring cup to press the crumbs evenly across the base and up the sides. If the sides slump, add a pinch more crumbs and press again. Chill at least 10 minutes so the butter re-solidifies before adding ganache.
Silky ganache: When pouring the hot cream over chocolate, resist the urge to stir right away. That 60-second rest begins melting the chocolate evenly. Stir slowly to avoid incorporating air bubbles, which can dull the surface.
Cool before mousse: If ganache is still fluid, it may swirl into the mousse. Fifteen to twenty minutes in the fridge is enough for a soft set that supports a clean mousse layer.
Fold, don’t beat: When combining whipped cream with the peanut butter base, use a gentle fold—sweep down the middle and up the sides, rotating the bowl—to preserve volume. If you knock out too much air, the mousse can feel dense.
Clean slices: Warm the knife under hot water, dry it, slice once, and wipe the blade between cuts. This prevents chocolate and mousse from smearing across the clean faces of each slice.
Make-ahead, storage, and freezing
Make-ahead: The pie benefits from an overnight chill. Assemble it fully, cover lightly with plastic wrap or an inverted pie dome, and refrigerate up to 24 hours before serving.
Storage: Keep leftovers covered and refrigerated for up to 4 days. The crust will slowly soften but remains delicious.
Freezing: For longer storage, chill the pie until set, then freeze uncovered for 1–2 hours to firm the top. Wrap the whole pie tightly in plastic wrap and foil, or flash-freeze individual slices, then wrap. Freeze up to 1 month. Thaw in the refrigerator overnight. The texture of the mousse stays surprisingly close to fresh.
Variations and add-ins
Salted pretzel crunch: Replace ¼ cup of the cookie crumbs with finely crushed pretzels for a sweet-salty crust.
Extra peanut butter cups: Swirl ½ cup chopped cups into the mousse before spreading it over the ganache, then add more on top.
Milk chocolate lovers: Make the ganache with milk chocolate for a sweeter, creamier middle layer. To keep balance, reduce the powdered sugar in the mousse by a tablespoon.
Nutty texture: Stir ¼ cup roasted, salted peanuts into the topping for crunch.
Gluten-free option: Use certified gluten-free chocolate sandwich cookies for the crust.
Mini pies: Press crust into a 12-cup muffin tin fitted with liners. Divide ganache and mousse among the cups. Chill until set and top with chopped cups. Great for parties and easy portioning.
Peanut-free twist: If you need to avoid peanuts and can use another nut or seed, almond butter or sunflower seed butter can stand in for peanut butter. Choose a no-stir variety for consistent results, and adjust powdered sugar to taste since some alternatives are less sweet.
Troubleshooting guide
Crust crumbles when slicing: The crumbs may not have been packed firmly enough, or the butter was slightly short. Next time, press more firmly and add an extra teaspoon of melted butter if the mixture seems dry. Chilling longer also helps.
Ganache looks oily or split: This can happen if the cream was overheated. Try whisking in a splash of room-temperature cream to bring it back together. If it still looks broken, blend briefly with an immersion blender to emulsify.
Mousse is too soft: The whipped cream might have been under-whipped or the peanut butter too warm. Whip cream to firm peaks and be sure the cream cheese is soft but not melty. A longer chill can firm a soft mousse.
Mousse looks grainy: Overwhipped cream can look curdled when folded in. Stop whipping as soon as the cream holds peaks that don’t droop.
Layers blended together: The ganache was likely too fluid when the mousse was added. Allow 15–20 minutes of chilling before topping next time; you’re aiming for a soft set that doesn’t jiggle like liquid.
Serving suggestions
Keep it simple with chilled slices and hot coffee or cold milk. For a plated dessert, drag a spoonful of warm caramel or chocolate sauce onto the plate, set a slice on the swoosh, and add a few roasted peanuts for crunch. Fresh banana slices, a dollop of lightly sweetened whipped cream, or a small scoop of vanilla ice cream all complement the peanut and chocolate flavors without overpowering them.
Frequently asked questions
Can I use crunchy peanut butter? Yes, but expect a nubby texture in the mousse. If you want silky mousse, stick with creamy.
Can I skip the cream cheese? It’s not recommended. Cream cheese adds structure and body. Without it, the mousse may not set firm enough to slice cleanly.
Will natural peanut butter work? It can, provided it’s stirred very thoroughly to fully incorporate the oil. The mousse may be a touch looser and slightly less sweet; taste and adjust powdered sugar as needed.
Can I make this dairy-free? You’d need a dairy-free cream cheese alternative, coconut cream for whipping, and a dairy-free chocolate. Texture will change, but you can still achieve a tasty, set pie.
How do I double this recipe? For a crowd, double the ingredients and assemble in a 9×13-inch pan to make no-bake bars. Increase the chill time to ensure the center sets fully.
What if I don’t have a mixer? You can whisk by hand if you’re patient, but a hand mixer makes the process quicker and yields a more consistent mousse. If whisking by hand, chill the bowl and whisk to help the cream whip faster.
Recipe timeline and workflow
Crust and ganache take around 20 minutes, with an additional 15–20 minutes of cooling. Mousse mixes in about 10 minutes, and assembly is quick. Budget a minimum of 3 hours for chilling; overnight gives the cleanest slices. If you need to serve the same day, start in the morning for an evening dessert.
Taste and texture profile
The first impression is chocolate. The crust delivers cocoa and crunch, followed by the lush melt of ganache. Then peanut butter comes forward, creamy and lightly salty, lifted by the airy body of whipped cream. Chopped Reese’s on top echo both flavors and add a playful, candy-shop finish. Sweetness is present but not cloying, balanced by cocoa’s bitterness and dairy’s richness.
Optional finishing touches
A light sprinkle of flaky sea salt over the ganache before adding the mousse accentuates the chocolate. A drizzle of warmed peanut butter across the top adds a bakery look. Chocolate shavings made with a vegetable peeler over a bar of room-temperature chocolate add delicate curls that melt on the tongue.
Food safety and handling
Because the pie contains dairy and whipped cream, keep it refrigerated until serving. Do not leave it at room temperature for more than 2 hours. Use clean, dry utensils when slicing to keep the layers neat and the pie fresh.
Clean-copy recipe card (copy into your WordPress recipe block if desired)
Title: Reese’s Peanut Butter Cup Pie
Yield: One 9-inch pie (8–10 slices)
Prep time: 30 minutes active
Chill time: At least 3 hours
Ingredients
Crust
1½ cups (150g) crushed chocolate cookies (like Oreos, minus filling)
3 tablespoons unsalted butter, melted
Ganache
4 oz (115g) semi-sweet chocolate, finely chopped
½ cup (120ml) heavy whipping cream
Peanut butter mousse
8 oz (225g) full-fat cream cheese, softened
½ cup (125g) creamy peanut butter
⅓ cup (67g) powdered sugar
1 teaspoon pure vanilla extract
1 cup (240ml) heavy whipping cream, chilled
Topping
½ cup Reese’s peanut butter cups, chopped
Optional: light drizzle of caramel sauce or chocolate shavings
Instructions
- Mix cookie crumbs with melted butter. Press into a 9-inch pie plate, bottom and sides. Chill.
- Heat cream to a simmer. Pour over chopped chocolate; rest 1 minute. Stir until smooth. Spread into crust. Chill 15–20 minutes.
- Beat cream cheese, peanut butter, powdered sugar, and vanilla until smooth. Whip cream to stiff peaks. Fold into peanut butter mixture.
- Spread mousse over ganache. Top with chopped Reese’s and optional caramel or shavings.
- Chill at least 3 hours or overnight. Slice with a warm, dry knife. Serve cold.
Final notes
This pie is designed to be reliable for beginners and rewarding for experienced bakers who appreciate clean layers and strong textures. The method scales easily, adapts to different chocolates and nut butters, and welcomes playful toppings. Once you make it the first time, you’ll see how forgiving it is—and how quickly it disappears.