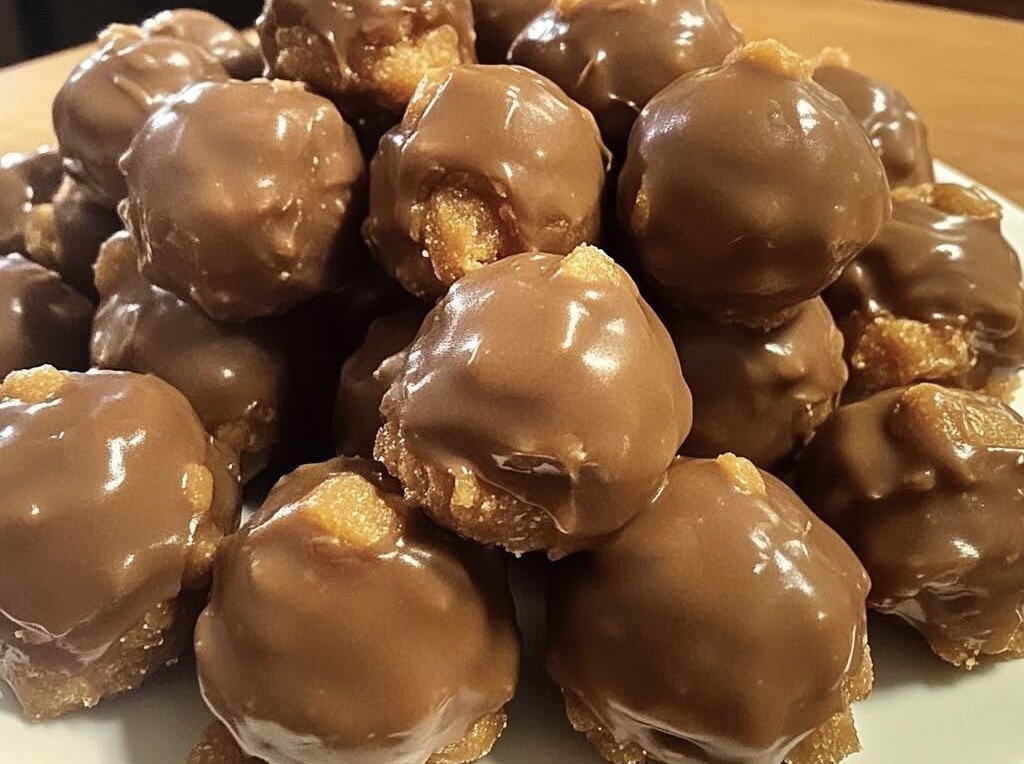
There’s something about the combination of chocolate and peanut butter that feels both nostalgic and indulgent. Add in the crunch of cornflakes and you get a treat that is irresistibly satisfying, with no baking required. These chocolate peanut butter cornflake balls are a perfect mix of creamy, crunchy, and sweet, making them an easy go-to recipe for busy days, parties, or just an afternoon pick-me-up.
The beauty of this recipe lies in its simplicity. It uses basic pantry staples and comes together in under an hour, most of which is just chilling time. The texture of slightly crushed cornflakes gives each bite a satisfying crunch, while the chocolate coating adds that smooth, melt-in-your-mouth finish. They are also a versatile treat—you can adjust the sweetness, swap ingredients, or even make them in a white chocolate version.
Ingredients
2 cups cornflakes, crushed slightly
1 cup creamy peanut butter
½ cup honey or light corn syrup
¼ cup powdered sugar (optional for extra sweetness)
1 teaspoon vanilla extract
Pinch of salt
200 g (7 oz) milk or dark chocolate for coating
1 tablespoon coconut oil or butter (optional, for smoother melting)
Making the Peanut Butter Base
Start by preparing the base mixture. Place the peanut butter and honey into a small saucepan and set it over low heat. Gently warm the mixture while stirring until smooth and well combined. The goal here is not to cook it but simply to soften the peanut butter so it blends easily with the other ingredients.
Once the peanut butter and honey are melted together, stir in the vanilla extract and a pinch of salt. The vanilla enhances the overall flavor, while the salt balances the sweetness and makes the peanut butter flavor pop. Remove the pan from the heat and add in the crushed cornflakes. If you like a sweeter base, sprinkle in the powdered sugar at this stage.
Folding in the Cornflakes
Mix everything gently but thoroughly until all the cornflakes are evenly coated with the peanut butter mixture. Crushing the cornflakes slightly before adding them helps the balls hold together better and creates a more pleasant texture—still crunchy, but not so big that they crumble apart when you bite into them.
Shaping the Balls
Allow the mixture to cool for a few minutes so it’s easier to handle. Using your hands or a small cookie scoop, form the mixture into small balls, about 1 to 1.5 inches in diameter. Place each one on a baking tray lined with parchment paper to prevent sticking.
Once all the balls are shaped, transfer the tray to the refrigerator and chill them for 20 to 30 minutes. This step is important because it firms up the peanut butter mixture, making the balls easier to dip in chocolate later.
Preparing the Chocolate Coating
While the peanut butter balls are chilling, melt your chocolate. You can use either milk or dark chocolate depending on your taste preference. Dark chocolate will give a richer, slightly more bitter contrast to the sweet peanut butter base, while milk chocolate offers a sweeter, creamier finish.
Place the chocolate and the optional coconut oil or butter in a microwave-safe bowl and heat in short bursts of 20–30 seconds, stirring each time until smooth. Alternatively, you can use a double boiler, which allows for gentle melting without risk of burning the chocolate. The added coconut oil or butter will make the chocolate slightly thinner, resulting in a smoother and shinier coating.
Coating the Balls
Take the chilled peanut butter balls from the fridge. Using a fork or a toothpick, dip each ball into the melted chocolate, turning to ensure it is fully coated. Let any excess chocolate drip off before placing it back on the parchment-lined tray.
If you want to get creative, you can drizzle a little contrasting chocolate (such as white chocolate on dark chocolate-coated balls) over the top for a decorative touch. Another option is to sprinkle a pinch of crushed cornflakes over the coating before it sets for extra crunch and a hint of visual texture.
Setting and Storing
After all the balls have been coated, place the tray back into the refrigerator until the chocolate sets completely. This usually takes about 20 minutes. Once set, the balls can be stored in an airtight container in the fridge for up to a week. If you prefer a softer texture, you can let them sit at room temperature for a few minutes before serving.
Serving Ideas
These chocolate peanut butter cornflake balls are delicious on their own, but they can also be served in a variety of ways. Arrange them on a dessert platter alongside other bite-sized sweets for a party. Wrap them in cellophane bags tied with ribbon for a homemade gift. Or simply keep a stash in the fridge for an easy grab-and-go snack.
Variations to Try
For those who enjoy experimenting, there are plenty of ways to change up this recipe. Use crunchy peanut butter instead of creamy for more texture. Replace some of the cornflakes with crisped rice cereal for a different kind of crunch. Swap the peanut butter for almond or cashew butter to suit dietary preferences or allergies. You can also roll the chocolate-coated balls in shredded coconut, crushed nuts, or colorful sprinkles before the chocolate sets for a fun twist.
Tips for Success
Crush the cornflakes just enough so they break down slightly but still maintain some texture.
If the peanut butter mixture feels too soft to roll, chill it for 10 minutes before shaping.
When melting chocolate, be careful not to overheat it, as this can cause it to seize or become grainy.
If dipping feels too messy, you can simply drizzle the melted chocolate over the balls instead.
These no-bake chocolate peanut butter cornflake balls are the perfect treat to make when you want something quick, satisfying, and indulgent. The combination of creamy peanut butter, crunchy cornflakes, and smooth chocolate is timeless, and the recipe is flexible enough to adapt to your taste and creativity.
Once you’ve made them, you may find yourself keeping the ingredients on hand for whenever the craving strikes—they’re just that easy and that good.