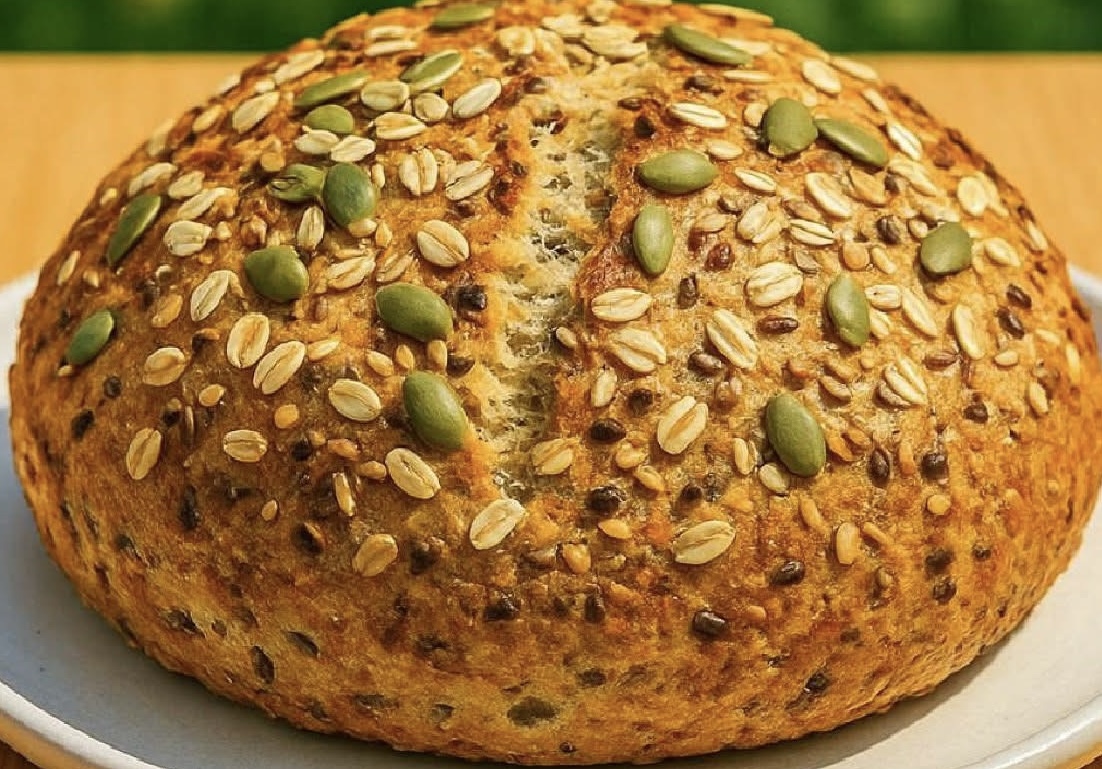
Multigrain bread is one of those deeply satisfying recipes that combine comfort, nutrition, and rustic beauty. Loaded with rolled oats and a medley of seeds, this bread delivers both a chewy crumb and a crisp, golden crust. Whether you enjoy it warm with butter, toasted under avocado, or as a foundation for hearty sandwiches, this multigrain loaf is packed with flavor and wholesome texture.
This version uses a blend of all-purpose or bread flour with oats, boosted with olive oil, and naturally leavened with instant yeast. The addition of mixed seeds such as sunflower, flax, chia, and pumpkin adds not only visual appeal but a wonderful crunch and nutritional value. It’s a bread you can feel good about eating and even better about baking.
Ingredients Overview
For the Dough
3 cups (375 g) all-purpose or bread flour
1 cup (90 g) rolled oats
1 tablespoon sugar or honey
2 ¼ teaspoons (7 g) instant yeast
1 teaspoon salt
1 ¼ cups (300 ml) warm water
2 tablespoons olive oil
2 to 3 tablespoons mixed seeds (e.g., pumpkin, flax, chia, sunflower)
For Topping
Extra rolled oats
Additional seeds (your choice)
Optional egg wash (1 egg mixed with 1 tablespoon water)
This ingredient list creates a rustic, artisan-style loaf that’s rich in flavor and texture. The combination of flour and oats forms the backbone of the dough, while the seeds contribute bite and nutrition. The egg wash and garnish provide a golden finish and help the toppings stick.
Mixing the Dough
Start by combining all your dry ingredients in a large mixing bowl: flour, oats, sugar (or honey), instant yeast, and salt. Stir them together with a wooden spoon or spatula until well blended.
Next, add the warm water and olive oil. Stir everything together until the mixture starts to form a rough, shaggy dough. This step helps hydrate the flour and oats while allowing the yeast to activate.
Add your mixed seeds into the dough and stir to incorporate them evenly. You can adjust the type and quantity of seeds to suit your taste. More seeds mean more crunch, but the dough may be slightly heavier as a result.
The dough will be somewhat sticky, which is normal for a hearty, whole-grain-style bread. At this stage, you don’t need to knead it vigorously. A few folds in the bowl using a spatula or your hands will suffice to bring the dough together.
First Rise (Bulk Fermentation)
Cover the bowl loosely with a kitchen towel, plastic wrap, or a reusable lid. Let the dough rise in a warm, draft-free place for about 1 to 1.5 hours. It should double in size and appear puffed and soft.
If your kitchen is cooler, it might take a bit longer. You can place the bowl inside a turned-off oven with the light on to create a warm environment for proofing.
This first rise is crucial for developing structure and flavor. The oats soften, the seeds begin to hydrate, and the yeast activates fully, giving the bread its lift and volume.
Shaping the Loaf
Once the dough has doubled in size, lightly flour your hands and the surface of the dough. Turn the dough out onto a clean surface or leave it in the bowl for a more rustic shaping method.
Form the dough gently into a round loaf by pulling the edges toward the center and tucking them underneath. Handle the dough gently to preserve the air bubbles formed during fermentation.
Place the shaped dough onto a parchment-lined baking tray or a floured baking sheet. If you plan to use a Dutch oven, place it on parchment for easy transfer.
Brush the top of the dough with egg wash if desired. This step gives the final loaf a glossy finish and helps the toppings stick during baking.
Sprinkle the top with a mixture of seeds and rolled oats. Press lightly to make sure they adhere.
Second Rise (Proofing)
Let the shaped loaf rest uncovered or loosely covered with a towel for 30 to 40 minutes. This second rise allows the dough to puff up one more time and gives the yeast another chance to create structure.
During this time, preheat your oven to 220°C (425°F). Make sure it’s fully heated before baking, as the high temperature helps form a beautiful crust quickly.
If you’re using a Dutch oven or cast iron pot, place it in the oven while preheating to get it hot before baking.
Baking the Bread
Place the risen loaf into the preheated oven on the center rack. If using a Dutch oven, transfer the loaf on its parchment into the hot pot, cover it with the lid, and bake covered for 20 minutes, then uncovered for 15 to 20 minutes more.
If baking directly on a tray, bake uncovered for 30 to 35 minutes. The bread should be golden brown, with a firm crust and a hollow sound when tapped on the bottom.
For an even crisper crust, you can place a shallow dish of hot water in the oven during baking to create steam, especially helpful when not using a covered pot.
Remove the bread from the oven and let it cool on a wire rack for at least 30 minutes before slicing. Cooling allows the crumb to set properly and makes slicing cleaner.
Texture and Crumb
This bread has a hearty texture from the oats and seeds while remaining light enough for everyday use. The crust is crisp and golden, while the inside is soft, slightly chewy, and speckled with grains and seeds.
The crumb structure is tighter than an airy white loaf but still pleasant and tender. Toasting enhances the nutty notes from the seeds and gives the oats a satisfying crunch.
It’s ideal for slicing thick or thin, depending on your purpose—whether for sandwiches, toast, or dipping into soup or olive oil.
Tips for Best Results
Use warm water, not hot. Water that’s too hot can kill the yeast. Aim for a temperature around 40°C (105°F).
Don’t skip the second rise. It helps improve texture and volume.
Use fresh yeast. Expired or poorly stored yeast won’t rise well and can result in dense bread.
Add seeds wisely. While you can experiment with seed blends, avoid adding too many large or dense seeds as they can weigh down the loaf.
Don’t slice while hot. Warm bread continues to cook as it cools. Slicing too early can result in a gummy texture.
Flavor and Seed Variations
This bread is flexible when it comes to mix-ins. Here are a few delicious options to try in future bakes:
Sunflower seeds
Pumpkin seeds
Ground flaxseeds
Chia seeds
Sesame seeds
Hemp seeds
Caraway or fennel seeds for a savory note
Cracked wheat or millet for added texture
You can also switch out part of the flour for whole wheat flour, rye flour, or spelt for a deeper, more complex flavor. Just be sure to keep at least half all-purpose or bread flour to maintain structure and rise.
Serving Ideas
Toast with butter or nut butter: The natural nuttiness from the seeds pairs beautifully with a pat of salted butter or almond spread.
Avocado toast: Top toasted slices with smashed avocado, lemon, and chili flakes.
Open-faced sandwich: Layer with hummus, roasted vegetables, or cheese and greens for a healthy, filling meal.
With soup or stew: This rustic bread holds up well to dipping in brothy or creamy soups.
Breakfast option: Serve slices alongside eggs or yogurt with fruit.
Storage and Freezing
Room Temperature:
Once fully cooled, store the bread in a bread box or wrapped in a clean kitchen towel inside a paper bag. It will stay fresh for 2 to 3 days.
Refrigerator:
For slightly longer storage, place the loaf in a sealed container in the fridge. Keep in mind this may dry out the crumb faster.
Freezer:
Slice the loaf once cooled and freeze slices in a zip-top freezer bag or airtight container. Toast straight from frozen for convenience.
Reheating:
To refresh the crust, place a slice in the toaster or reheat a whole loaf in the oven at 175°C (350°F) for 10 minutes.
Why You’ll Love This Bread
It’s nutritious, made from scratch, and fully customizable
It’s hearty and satisfying without being overly dense
It requires no stand mixer or kneading machine
The crust bakes up golden and crisp every time
It makes your kitchen smell amazing while baking
It’s great for meal prep—bake once, eat all week
Final Thoughts
This multigrain seeded bread recipe delivers everything a great loaf should: flavor, texture, and beauty. It’s the kind of recipe that becomes a staple, one you can bake weekly with little fuss and lots of reward.
Whether you enjoy it warm with breakfast, toasted with toppings, or as a healthy base for a sandwich, this bread offers a nourishing and satisfying experience in every slice. The mix of grains and seeds makes it feel substantial and rustic, while the olive oil and soft crumb keep it approachable and tender.
Once you get comfortable with the technique, you’ll find yourself tweaking it to your taste—adding more seeds, swapping flours, or baking it in different shapes. It’s the kind of flexible, reliable recipe that any home baker can master.