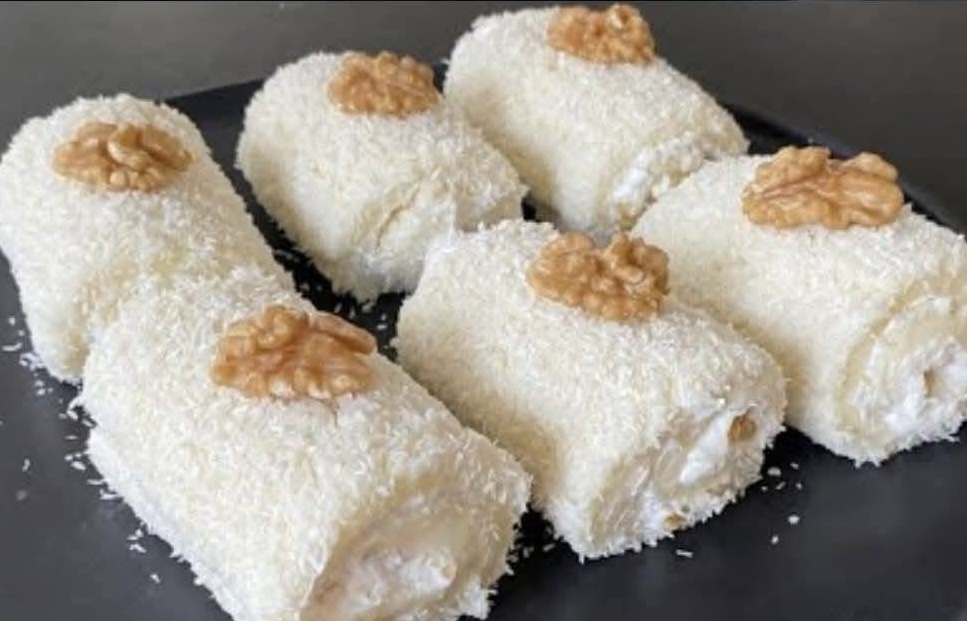
Coconut rolls filled with soft, creamy custard offer a delightful blend of flavors and textures. The richness of the custard paired with the sweet, delicate coconut in a soft bread roll creates a dessert or snack that feels indulgent without being overwhelming. These rolls are perfect for special gatherings, tea time, or simply to treat yourself to something comforting and homemade.
The process involves two main components: a rich custard filling and a soft dough that is baked into rolls, then coated in coconut. The result is a sweet bread roll with a creamy center and a light coconut shell that is soft to the touch but full of flavor.
In this guide, you’ll find everything you need to know to make Coconut Rolls with Custard Filling from scratch. This includes how to prepare the custard layer, make the perfect dough, assemble the rolls, and coat them for that final coconut touch. Each step has been broken down clearly to ensure success, whether you’re an experienced home baker or trying this type of recipe for the first time.
Ingredients
For the Custard Filling:
1 liter (4 cups) whole milk
1 cup granulated sugar
1 cup + 1 tablespoon all-purpose flour
60 grams (4 tablespoons) unsalted butter
1 teaspoon vanilla extract
For the Dough:
1 cup warm milk
1 tablespoon instant yeast
1/2 cup sugar
1/4 cup vegetable oil
1/4 cup plain yogurt
2 eggs
4 to 5 cups all-purpose flour (or as needed)
1/2 teaspoon salt
For Brushing and Coating:
1/2 cup condensed milk
1/2 cup whole milk
2 cups desiccated coconut
How to Make Coconut Rolls with Custard Filling
Step 1: Prepare the Custard Filling
Start by making the custard filling as it needs time to cool completely before using it in the dough. The custard layer provides a rich, creamy center and should be smooth and thick.
In a large saucepan, pour in the milk. Add the sugar and flour. Whisk everything together until the flour is completely dissolved and the mixture is lump-free.
Place the saucepan over medium heat. Stir continuously using a whisk or wooden spoon to prevent the mixture from sticking to the bottom.
After a few minutes, the mixture will begin to thicken. Continue stirring until it reaches a thick, pudding-like consistency. This process may take about 10 to 12 minutes depending on your stove.
Once thick, remove the pan from heat. Stir in the butter and vanilla extract. The butter will melt into the hot custard and add a rich, silky texture.
Transfer the custard to a bowl. Cover it with plastic wrap, making sure the wrap touches the surface of the custard to prevent a skin from forming. Let it cool to room temperature, then refrigerate for at least 1 hour.
Step 2: Prepare the Dough
The dough used for these coconut rolls is enriched, meaning it contains fat and sugar, which results in a soft, slightly sweet bread. It’s important to knead the dough well to develop the gluten, which will help create the perfect texture.
In a large mixing bowl, combine warm milk, sugar, and instant yeast. Let it sit for 5 to 10 minutes until it becomes foamy, indicating that the yeast is active.
Add the oil, yogurt, and eggs to the yeast mixture. Mix well.
Gradually add the flour and salt, one cup at a time, mixing after each addition. Continue adding flour until a soft dough forms. It should be slightly sticky but pull away from the sides of the bowl.
Transfer the dough to a floured surface and knead for about 8 to 10 minutes until smooth and elastic.
Place the dough into a lightly oiled bowl. Cover it with a clean kitchen towel or plastic wrap. Let it rise in a warm place for about 1 to 1.5 hours or until it doubles in size.
Step 3: Shaping the Rolls
Once the dough has doubled, punch it down to release the air.
Transfer the dough onto a floured surface. Divide it into equal portions depending on the size of rolls you want. For medium-sized rolls, divide the dough into 16 to 18 pieces.
Roll each piece into a ball, then flatten it slightly with your palm.
Spoon about 1 tablespoon of the prepared and chilled custard into the center of each piece. Be careful not to overfill.
Fold the edges of the dough over the custard to enclose it completely. Pinch the seams tightly to seal.
Place the rolls seam-side down on a baking tray lined with parchment paper. Keep some space between them as they will expand during baking.
Cover the tray with a towel and let the rolls rise again for 30 to 45 minutes.
Step 4: Baking the Rolls
Preheat your oven to 180°C (350°F).
Once the rolls have risen again and feel puffy to the touch, place the tray in the oven.
Bake for 18 to 22 minutes or until the tops are lightly golden and the bottoms are cooked through.
Remove the rolls from the oven and let them cool slightly on a wire rack.
Step 5: Coconut Coating
To finish the rolls, you’ll dip them in a sweet milk mixture and roll them in coconut. This adds a moist, flavorful coating that balances perfectly with the custard filling.
In a shallow bowl, mix the condensed milk and whole milk together. This mixture should be light and slightly runny, not too thick.
In another shallow bowl, place the desiccated coconut.
Once the rolls are cool enough to handle but still slightly warm, dip each roll into the milk mixture quickly so they don’t become soggy.
Immediately roll the dipped bread in the coconut, covering all sides.
Set the coated rolls aside on a clean tray or wire rack to rest for a few minutes.
Serving and Storage Tips
Coconut Rolls with Custard Filling are best enjoyed fresh on the same day. However, if you have leftovers, store them in an airtight container at room temperature for up to 2 days.
For longer storage, refrigerate them. When serving from the fridge, bring them back to room temperature or warm them slightly to soften the bread and custard.
Avoid freezing, as the custard filling may become watery after thawing.
Tips for Best Results
- Don’t skip chilling the custard. It must be thick and cold to make shaping the rolls easier.
- Seal the dough completely around the custard to avoid leaking during baking.
- Use whole milk for the custard and coating mixture for best flavor and richness.
- If your oven heats unevenly, rotate the tray halfway through baking.
- To make the rolls even more aromatic, sprinkle a little vanilla sugar or cinnamon sugar over the coconut layer after coating.
Customization Ideas
There are several variations you can try with this recipe to suit your taste:
- Chocolate Custard: Replace 1/4 cup of the flour in the custard with unsweetened cocoa powder for a chocolate twist.
- Fruit-Infused Custard: Add a tablespoon of fruit puree like mango or raspberry to the custard for a fruity center.
- Toasted Coconut: For a deeper coconut flavor, lightly toast the desiccated coconut before rolling the bread.
- Cardamom or Rose Water: Add a pinch of ground cardamom or a few drops of rose water to the custard for a Middle Eastern touch.
- Mini Rolls: Make smaller rolls for bite-sized treats perfect for dessert tables or parties.
Why You’ll Love This Recipe
Coconut Rolls with Custard Filling are one of those baked goods that strike the perfect balance between sweetness and texture. The pillowy dough contrasts beautifully with the creamy, sweet custard center. The final touch of soft coconut gives it a tropical elegance that appeals to both kids and adults.
Because each roll is individually shaped and filled, they also make a great presentation for guests or events. Whether served on their own or alongside tea or coffee, they’re guaranteed to stand out.
Conclusion
Making Coconut Rolls with Custard Filling from scratch takes a little time and patience, but the reward is a soft, fluffy, custard-filled roll coated in delicate coconut flavor. These are not just rolls, but a sensory experience — the creamy filling, the soft bread, and the sweet coconut create something truly special.
From preparing the rich custard to shaping and baking the rolls, every step brings you closer to a satisfying homemade treat. With practice, the process becomes second nature, and these rolls may very well become one of your favorite things to bake.
Whether you’re making them for a celebration or just to enjoy on a quiet afternoon, Coconut Rolls with Custard Filling are worth every step and every bite.