Chocolate lava cupcakes are the kind of dessert that effortlessly blends elegance with indulgence. Each bite delivers a rich, dark chocolate flavor wrapped in a tender cake shell, hiding a warm, flowing center of molten goodness. These cupcakes are more than just a treat—they’re a sensory experience. The moment your fork breaks through the surface and that warm chocolate core begins to ooze, it becomes clear that this dessert is something special.
Unlike traditional chocolate cupcakes that are fully set and frosted, lava cupcakes focus on simplicity. Their beauty lies in contrast: the delicate, barely set edge surrounding a silky liquid center. They’re easy to prepare, require only a few basic ingredients, and bake in under 10 minutes. Whether you’re serving them as a romantic dessert, a dinner party finale, or just an evening indulgence, chocolate lava cupcakes deliver every time.
The Magic Behind Lava Cupcakes
The key to the lava center lies in timing and temperature. The batter is rich and thick, thanks to a generous amount of chocolate and eggs. The outer part of the cupcake sets during baking, while the inner core remains underbaked, creating that luscious molten center. Unlike undercooked cakes that feel like a mistake, lava cupcakes are carefully designed to give that exact texture—gooey inside and slightly crisp around the edges.
The structure is firm enough to hold its shape once baked but soft enough to release the liquid center when cut. This balance makes it one of the most rewarding desserts to prepare and serve, especially since the process is much easier than it looks.
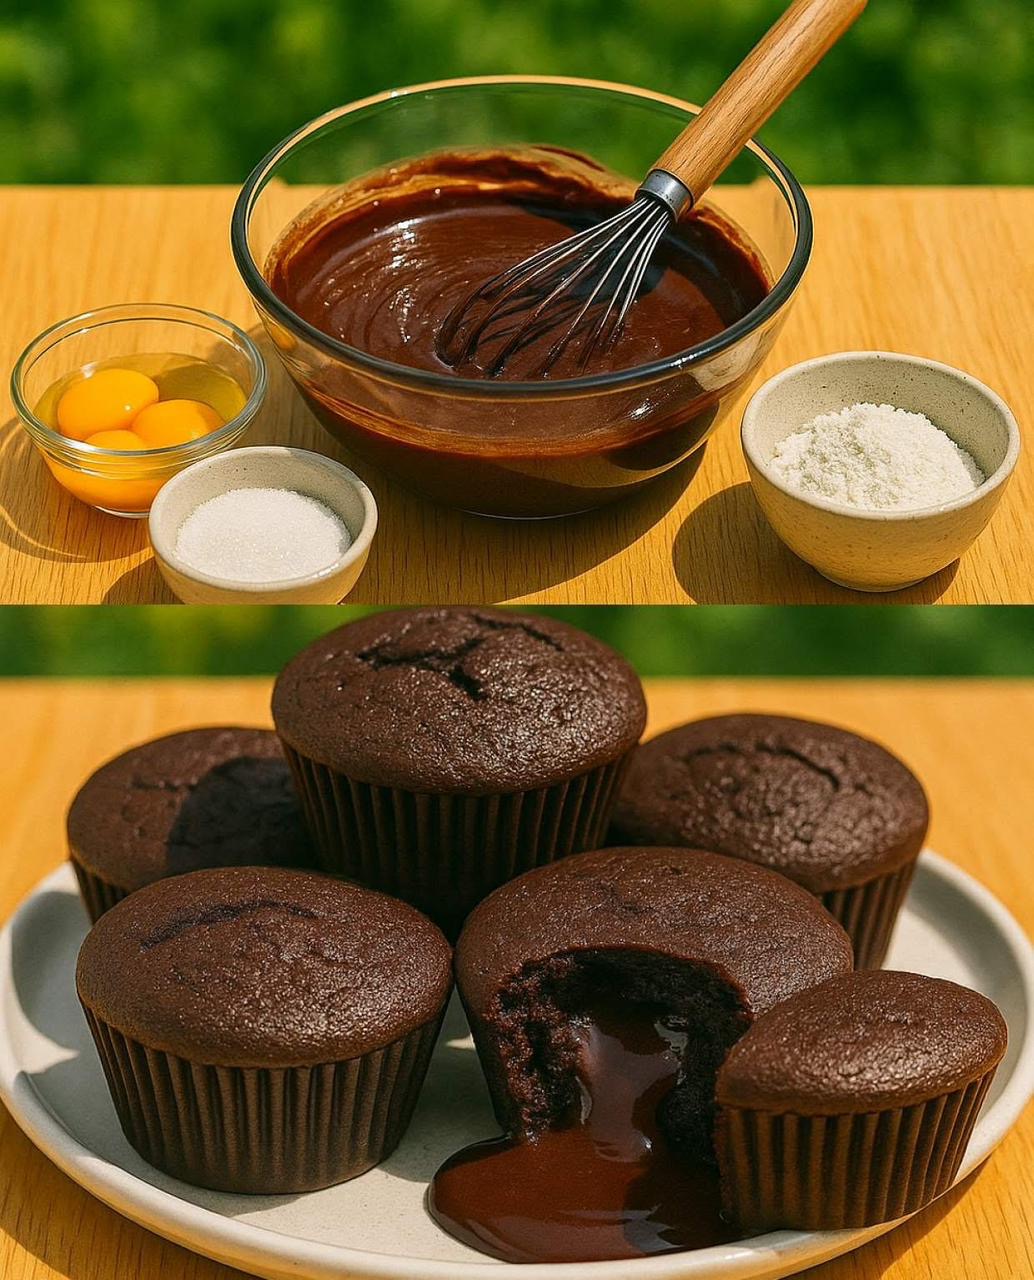
Ingredients and Their Roles
Each ingredient in this recipe contributes to the texture, richness, and balance of the final cupcake:
- Eggs: These form the backbone of the structure. Whisked well with sugar, they create volume and help trap air in the batter, giving the cupcake its lightness around the edges while keeping the center soft.
- Sugar: A moderate amount of sugar not only sweetens the batter but also helps achieve a golden crust and smooth mouthfeel.
- Dark chocolate: This is the star of the show. High-quality dark chocolate with a cocoa content between 60–70% gives a bold, slightly bitter edge that complements the sweetness of the cupcake and highlights the molten texture.
- Butter: When melted with the chocolate, butter adds richness and moisture to the batter. It also enhances the overall mouthfeel of the finished cupcakes.
- Flour: Just enough flour is added to bind the ingredients and set the outer edge of the cupcakes. Using too much flour can reduce the lava effect, so keeping it minimal is essential.
Choosing the Right Chocolate
The flavor and texture of your lava cupcakes depend heavily on the chocolate you choose. Opt for high-quality dark chocolate bars over chips. Chocolate chips often contain stabilizers that prevent smooth melting, while baking chocolate or couverture chocolate melts into a silkier mixture. Aim for chocolate with a cocoa content of at least 60%. Too high, and the cupcakes may taste overly bitter; too low, and you may not get the rich depth needed for that signature molten center.
If you like your lava center extra rich, consider mixing dark chocolate with a touch of semi-sweet or milk chocolate. This balances the bitterness and creates a smoother texture.
Step-by-Step Method
Start by preparing your equipment. Preheat the oven to 200°C (390°F), and line a standard muffin tray with paper liners. If you prefer a crustier edge, you can skip the liners and grease the cups with butter and a dusting of cocoa powder to avoid sticking.
1. Melt Chocolate and Butter
Place chopped chocolate and unsalted butter in a heatproof bowl. Melt gently over a saucepan of simmering water (double boiler method), stirring frequently until smooth and glossy. Alternatively, melt in a microwave in short bursts of 20–30 seconds, stirring between each burst to avoid burning.
Let the mixture cool slightly to avoid scrambling the eggs in the next step.
2. Whisk Eggs and Sugar
In a large mixing bowl, whisk together the eggs and sugar. Use a hand mixer or whisk vigorously by hand until the mixture becomes pale, fluffy, and thick. This step incorporates air into the batter and helps create a light outer edge with a molten core.
3. Combine with Chocolate Mixture
Pour the slightly cooled chocolate-butter mixture into the egg-sugar mixture. Stir gently until well combined. Avoid overmixing to retain the lightness.
4. Fold in Flour
Sift the flour into the bowl to remove any lumps and evenly distribute it into the batter. Fold the flour gently using a spatula or spoon. Do not beat the mixture—gentle folding ensures you don’t deflate the air whipped into the eggs.
5. Fill the Muffin Tray
Divide the batter evenly among the muffin cups. The batter should fill each cup about three-quarters of the way. This allows enough space for the cupcakes to rise without spilling over.
6. Bake with Precision
Place the muffin tray into the preheated oven and bake for 8–10 minutes. This timing is critical. The outer edge should appear set and slightly risen, while the center remains soft. The surface may have a gentle dome and small cracks, but it shouldn’t be fully firm. If baked too long, the center will set completely, losing the lava texture.
Check the cupcakes at the 8-minute mark. Slight pressing on the top should reveal firmness at the edge and softness in the center.
7. Cool Slightly Before Serving
Once baked, remove the cupcakes from the oven and let them sit for 1–2 minutes. This resting period allows the cupcakes to firm up slightly, making them easier to handle and enhancing the lava effect when served.
Serve warm, ideally within 10–15 minutes of baking. If cooled completely, the lava center may firm up. You can reheat briefly in the microwave for 10–15 seconds to restore the molten center.
Serving Suggestions
Chocolate lava cupcakes are rich and decadent on their own, but pairing them with the right accompaniment takes them to another level. A scoop of vanilla ice cream on top or on the side adds a cold, creamy contrast to the warm chocolate center. Fresh berries like raspberries or strawberries bring a burst of acidity and freshness. You can also dust the tops with powdered sugar or a spoonful of whipped cream for added elegance.
Other delicious pairings include:
- A drizzle of salted caramel
- Crushed pistachios or hazelnuts for crunch
- Espresso or strong black coffee for sipping alongside
Tips for Success
- Use room temperature eggs: They incorporate more easily and trap air better during whisking.
- Don’t overbake: The magic lies in the molten center. Pull them out as soon as the edges set.
- Grease muffin cups well if skipping paper liners: This ensures the cupcakes release cleanly.
- Cool melted chocolate slightly before mixing: Avoids cooking the eggs.
- Use a scale for accuracy: Especially important for the flour and chocolate quantities.
Variations and Add-Ins
Once you’ve mastered the base recipe, there’s plenty of room for creativity. You can add a small piece of chocolate or a flavored ganache cube into the center of each muffin cup before baking. As the cupcakes bake, this center melts even more dramatically. Try different flavor combinations such as:
- Orange zest in the batter for a citrus twist
- Instant espresso powder to enhance the chocolate depth
- A spoonful of peanut butter or hazelnut spread in the center
- Spices like cinnamon or chili for a hint of heat
For a dessert with a gourmet feel, top each cupcake with a shard of dark chocolate or edible gold leaf right before serving.
How to Store and Reheat
While lava cupcakes are best enjoyed warm and fresh from the oven, they can be made ahead and reheated gently when needed.
Store cooled cupcakes in an airtight container at room temperature for up to one day or in the refrigerator for up to three days. To reheat, microwave each cupcake for about 10–15 seconds. The center should return to a molten state without overcooking the edges.
You can also freeze baked cupcakes. Once cooled completely, wrap individually and store in a freezer-safe bag. Reheat directly from frozen in the microwave or oven until the center is warm and soft again.
Serving Ideas for Special Occasions
Chocolate lava cupcakes are an impressive choice for birthdays, romantic dinners, or festive holidays. Serve them on small dessert plates with a dollop of mascarpone or vanilla bean ice cream and a sprig of mint. Decorate the plate with chocolate shavings, a few fresh berries, or a swirl of fruit coulis. Their portion-controlled size makes them easy to serve, while their rich texture makes them feel like a restaurant-style dessert.
For entertaining, consider making mini versions using a mini muffin tin—adjust the baking time accordingly to about 5–6 minutes. These smaller versions are perfect for dessert tables or parties.
Summary
Chocolate lava cupcakes combine the rich flavor of dark chocolate with the tender texture of a cupcake and the irresistible allure of a molten center. This simple yet elegant dessert takes less than 30 minutes from start to finish and relies on only five main ingredients. With the right timing and a touch of care, you can create bakery-quality lava cupcakes at home without any special tools or techniques.
Perfectly warm and melting in the center, they’re made to be savored slowly, one gooey bite at a time.
Ingredients
- 3 eggs
- 100 g sugar (½ cup)
- 150 g dark chocolate (about 1 cup chopped)
- 100 g unsalted butter (7 tbsp)
- 40 g all-purpose flour (1/3 cup)
Instructions
- Preheat oven to 200°C (390°F). Line a muffin tray with paper cups.
- Melt chocolate and butter together in a heatproof bowl over simmering water or in the microwave. Stir until smooth.
- In another bowl, whisk eggs and sugar until pale and thick.
- Add the melted chocolate mixture to the eggs and stir until combined.
- Sift in the flour and gently fold until just mixed.
- Divide batter into the prepared muffin cups.
- Bake for 8–10 minutes. The edges should be set, but the center soft.
- Let cool for 1–2 minutes, serve warm to enjoy the molten center.
Perfect with ice cream or fresh berries, these cupcakes are pure chocolate indulgence in every bite.